By nature databases do not have a hierarchical structure. Databases are either large flat files or they are organized in a relational structure, showing relationships rather than a parent-child hierarchy. However, tables of contents are inherently parent-child hierarchical. Therefore, since you will display your database content on an NXT site and use a table of contents to access the information, you will need to create the structural hierarchy from your database content.
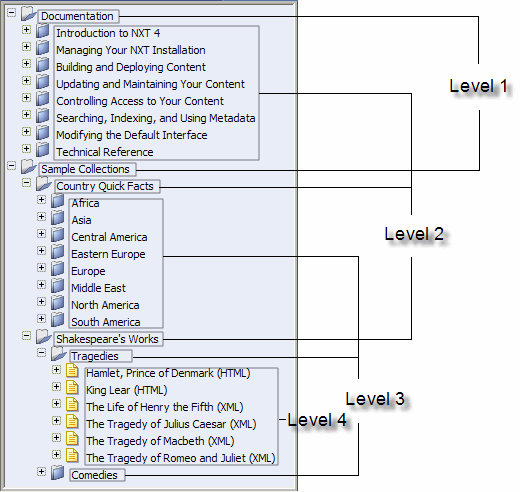
The ODBC Content Bridge does not rely upon the database to dictate the structure of the table of contents, it relies on you. You use SQL statements to create the various levels of hierarchy that you want. Figure 1 graphically shows what "levels" mean.

Figure 1. Table of Contents Levels
| The ODBC Content Bridge does not support the creation of more than nine levels of hierarchical structure for a given content collection. |
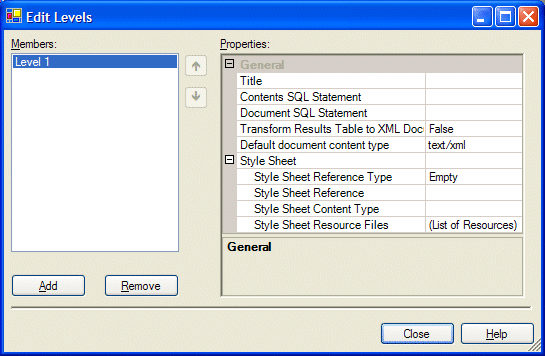
Click on the  button to the right
of the Levels property field to display the Edit Levels dialog (Figure
2). Figure 2 shows the Edit Levels dialog after you click the Add
button to add a new level. When you first open this dialog the Members and
Properties boxes will be blank or empty. Click the Add button to add new
hierarchical levels. You must provide the following information to the Library
Manager for each level that you add:
See Style Sheets for more information on formatting and displaying content from your ODBC database.

Figure 2. ODBC Content Bridge Levels Dialog
This property is optional. The title property will only show up in the Members
box. This property enables you to label your levels in a more meaningful way
than just "Level 1, Level 2," and so on. For example, suppose you have a
database of employee information for your entire company, and you have multiple
office locations across the world, the first level that you may want to set up
would be by office location. So, you would type Office Location in
the title property field. You would then see Level 1 (Office Location)
displayed in the Members box. This is the only place that Library Manager uses
the title property.
The Library Manager and ODBC Content Bridge use the "Contents SQL Statement" for
each level to build out your table of contents hierarchy. During the build
process, the ODBC Content Bridge builds your table of contents from these
statements and records that table of contents information in your content
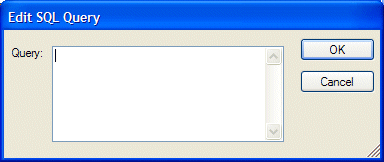
collection (NXT file). You can type the SQL query statement directly into the
Contents SQL Statement field, or you can click the  button to the right of the field to display the Edit SQL Query dialog in
Figure 3.

Figure 3. Edit SQL Query Dialog
For the most part the syntax for these SQL statements is common SQL. However, there are elements in each query statement that are specific to NXT. You must include these NXT SQL elements for the content bridge to successfully build your content collection. These NXT elements include setting up Name, ID, and Title aliases, and, using NXT Replacement Variables.
NXT requires Name, ID, and Title values for each node on each level of hierarchy (regardless the content bridge in use) in the table of contents. So, part of the SQL you use in the Contents SQL Statement must designate these values. The ODBC Content Bridge only requires that you designate the ID value, and this ID value must be unique. If you only designate the ID value then the content bridge will re purpose the ID value for the Name and Title values also. If you designate the ID and Name values but not the Title value, then the Name value will be re purposed as the Title value. However, if you do not designate the Title value, the titles in your table of contents on your NXT site will be in lower case (no capital letters) regardless of how they appear in the database. So, to preserve capitalization (upper case letters), you must designate a title value. The following is an example of a Level 1 Contents SQL Statement with the first level being Office Location:
select distinct officelocation as ID, officelocation as name,
officelocation as title from employee order by officelocation |
| The syntax in this example is for a Microsoft Access database. Please follow the syntax guidelines for your particular database to ensure uniqueness of the ID value. |
This statement produces a list of unique office locations at the first level of hierarchy.
| The replacement variables in this section are specific to the ODBC Content Bridge. Although NXT uses other replacement variables to render your NXT site, the syntax and usage of these replacement variables only applies to the ODBC Content Bridge. For information regarding other NXT replacement variables see HTML Components in the Reference section of this Documentation. |
The SQL in Level 1 is very straightforward with only a small requirement for designating the Name, ID, and Title values. For Level 2 and down, the SQL syntax is standard (with the Name, ID, and Title designations) except for one addition; an NXT "replacement variable." Replacement variables enable you to encompass multiple SQL queries into one SQL statement. The syntax or a replacement variable for the ODBC Content Bridge is:
<!-- ID_L1 --> |
You would use this particular replacement variable in a Level 2 SQL statement because it refers to an ID in Level 1 (L1). To demonstrate the usage of this replacement variable, let's continue the company database of employee information scenario. Suppose that after the office location level that you want the next level to list the appropriate Departments under each office location. To accomplish this for Level 2, use a replacement variable in the following way:
select distinct department as ID, department as name,
								department as title from employee where
officelocation='<!-- ID_L1 -->' order by department |
| When you designate "text" ID values, you must enclose the replacement variable in single quotes. When you designate "numerical" ID values, you must leave the single quotes off. |
How does the use of this replacement variable enable you to have multiple SQL queries in one statement? Suppose you have a company that has three different office locations across the world. With standard SQL, you would need to write three SQL queries with different "where" sections to get the respective departments for each office location. Like so:
select distinct department as ID, ... where officelocation='officelocation1'
... |
select distinct department as ID, ... where officelocation='officelocation2'
... |
select distinct department as ID, ... where officelocation='officelocation3'
... |
However, if you use NXT replacement variables, you only need the one query statement with the replacement variable and you get the three automatically. When the ODBC Content Bridge builds your content collection, it dynamically replaces the replacement variable with every ID value identified in the Level 1 SQL statement and runs each individual query to build out your table of contents structure. Depending on the number of levels that you set up, you continue using replacement variables in the "where" section of your SQL statements. For example, the following would be Level 3 that lists the names of the employees of the company database:
select employeeID as ID, lastname+firstname as name,
								lastname+', '+firstname as title from employee where
								officelocation='<!-- ID_L1 -->' and
department='<!-- ID_L2 -->' order by lastname, firstname |
Because of this statement the ODBC Content Bridge lists the appropriate employees in the respective departments and office locations. As you can hopefully see, replacement variables simplify the process of creating levels of hierarchy from your database content. Creating levels of hierarchy is not your primary goal...it is to retrieve content from your database. The Contents SQL Statement only creates a structure for you to navigate to the respective content. To retrieve the database content you need the Documents SQL Statement.
The Documents SQL Statement enables you to ultimately retrieve the database content you want to display to your end users. You can use this SQL statement on every level of hierarchy. If you use this SQL statement on levels above the last "document" level, it will appear in your table of contents like a folder node with a selectable title. And, when you click on the title (not the folder), NXT will display the results of that query in the document viewing area.
Similar to the Contents SQL Statement, you can either type the SQL statement
directly into the Documents SQL Statement field or click the  button to the right of the field to display the Edit SQL Query dialog in
Figure 3. The syntax for this statement is similar to that for the Contents SQL
Statement. For instance, continuing the scenario, suppose you want all
information on every employee in your database. The following SQL statement
would go in the Documents SQL Statement in Level 3:
select employeeID as ID, lastname+firstname as name,
								lastname+', '+firstname as title, * from employee where
employeeID=<!-- ID_L3 --> |
This statement retrieves the database content of the select statement for each ID of Level 3 into "documents" to place in your content collections. In other words, the ODBC Content Bridge creates an individual document on the fly for each set of data retrieved for each respective ID from the database according to the SQL query. The content bridge places these documents into your content collection. Once you have all of your Contents and Documents SQL Statements complete, you need to determine how to handle and display the resultant data.
For databases that have raw data, meaning, data that is organized like a spreadsheet, you can choose to transform the results of your queries into XML. This is a boolean value of either True or False that you can select from the drop down list. True means to transform your results into XML, and false means to leave your results as is.
If you choose to transform your results to XML, the ODBC Content Bridge will create an XML document on the fly for each retrieved database record and format it in XML. This means that every independent piece of data will be within XML element tags. Names of the XML element tags correspond with the column or field names in your database. Please see XML Document Format for more information regarding the format of the XML documents that the ODBC Content Bridge creates.
Many ODBC databases have fields that contain data in varying formats. One field may have text while another has images, and still another field contains Word documents or sound files. The ODBC Content Bridge makes it possible to use the content in these fields in their native formats as a document.
If you set the Transform Results Table to XML Document property to False, the ODBC Content Bridge expects to find a native format document stored in the 'document' field and its content type stored in a field called 'content-type'. If you cannot provide this information from your database and most or all of your documents are the same type, you can set the Default Document Content Type property to the document type. Then, if the ODBC Content Bridge does not find the content-type field in the results set, it uses the value of the Default Document Content Type property instead.
You can select one of the following content types from the property's drop down list:
|
|
|
Copyright © 2006-2023, Rocket Software, Inc. All rights reserved.