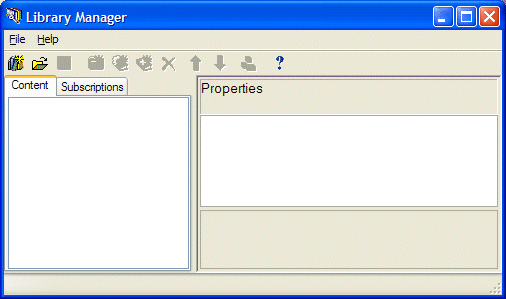
The Library Manager is the tool for creating and managing your libraries. Within this interface, you create and manage your libraries one at a time. When you first open Library Manager, depending on your preferences, you may see a fairly blank interface, as in Figure 1, or you may see the last loaded library. Regardless, you will need to, at some time, create a new library. The process for starting a new library is very straightforward.

Figure 1. Library Manager Interface on First Time Opening
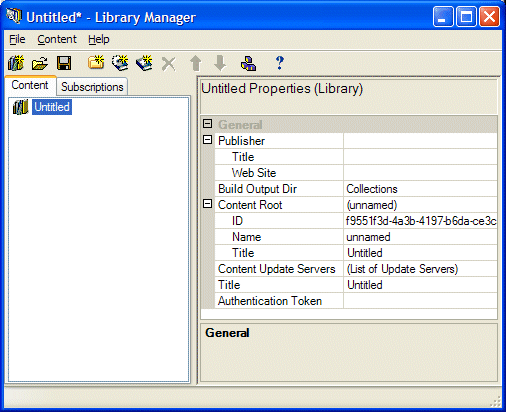
When you choose New from the File menu at the top of the Library
Manager window to begin a new library, you will see a list of properties appear
in the Library Manager Properties pane. Click on  to expand all of the library properties, as in Figure 2. These properties
provide ways to uniquely identify your library and prepare for the adding of
content.

Figure 2. Library Manager with New Library
The Publisher information is not required and consists of the following properties:
The Title property usually represents a company name for commercial publishers or a department name for corporate publishers. This value does not have to be unique and can be any alphanumeric characters.
The Web Site property is a URL for the home page for the publisher. This allows clients of the library to obtain more information about the publisher.
The Build Output Dir property specifies the destination directory for the library install files, content collections, and content updates. Library Manager places all the files it creates, updates, or imports (library definition and install files, content collection and update files, and configuration files) in this directory when you build your library content.
The Content Root properties are for identifying the root folder that contains the library content when you install the library into an NXT site. This property contains the following fields:
The ID property specifies the ID that serves as the unique identifier for the library and the root folder. The library install file and all subscriptions for this library reference this library ID. Do not change the library ID once you distribute the library content or create any subscriptions for the library.
The Name property specifies the name of the library and root folder and must be unique among siblings of this folder. The name of the folder is never seen by end-users, but is used when indicating paths for content, and can be included in links.
The Title property specifies the title of your library that you see in the content tree tab and the title for the root folder that you see in your site's table of contents.
The Content Update Servers property is a list of web servers that your clients can use to obtain updates for the content in your library. The update servers listed for a library allow end users of the library to automatically update their content. Your end users use the Library Installer application to update their local content. See Updating and Rebuilding of the Updating and Managing Your Content section in this Documentation for more information regarding end user updating.
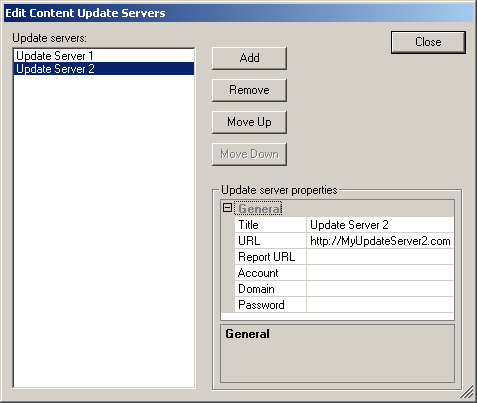
Click the  button to the right of the Content
Update Servers property field to display the dialog in Figure 3. The Update
Servers list field displays a list of all update servers for a given
library. When you select an update server in this list, its properties appear
in the Update server properties fields at the bottom-right of the Edit
Content Update Servers dialog box.

Figure 3. Update Servers Dialog
When your end users update their library content, the Library Installer application connects to the default update server (usually the first in the list) and downloads the updated library install file along with any new content collections or update files as necessary to update the library content. If Library Installer cannot connect to the update server (or if one or more files could not be downloaded), then Library Installer connects to the other update servers in the list (in order) to complete the update of the library content.
Each content update server entry contains the following fields:
| Field | Description |
|---|---|
| Title | Specifies the name for the update server that is displayed to the end-user. |
| URL | Specifies the URL path to the download directory on
the publisher web site. This directory should contain the library install
file and all content collection and content update files (all these files
reside in your library's output directory). Note: You can use a secure server as your update server. If you do, remember to use https instead of http for
the protocol of the URL. (See
Integrating NXT 4 with SSL with SSS for related information.) |
|
Report URL |
Specifies the URL path to where the update tracking server reports will be sent.
Note: You can use a secure server as your update update tracking server.
If you do, remember to use |
| Account | (Optional) Specifies the account name to use if the content update server requires authentication. If the content update server requires authentication and an account name is not provided, Library Installer will prompt the end-user for a user name and password. |
| Domain | (Optional) Specifies the domain name to use if the content update server uses a domain-based authentication scheme like NTLM or Kerberos. A domain name is not required for basic authentication. |
| Password | (Optional) Specifies a password to use if the content update server requires authentication. If a password is required and you do not specify the value here, Library Installer will prompt the end-user for a password when connecting to the server. |
The update servers are listed in order of priority. To add an update server to the list, click the Add button then fill in the fields for the new update server. To remove an update server, select the update server in the list and click the Remove button. To change the order of the list of update servers, use the Move Up and Move Down buttons.
The Library Installer works with the settings you include in the Library Manager. By understanding how the Library Installer authenticates, you can better decide if and how you want your users to log in to the Update Server or the Update Tracking Server.
If your Update Server or Update Tracking Server require authentication, then your users must present appropriate credentials to log into those servers. If you choose to set a user name, domain, and password in the Library Manager, then all users will use those credentials. If you do not set these values in the Library Manager, then your users will need to log in to the Update Server and Update Tracking Server in order to get their downloads or update their update tracking reports. However, this login is typically only required once.
After a successful login, the Library Installer stores the credentials in the Libinst.config file on the users local machine. Library Installer will then use these credentials on subsequent connections to the Update Server and Update Tracking Server. Should these credentials fail, the Library Installer will check the Library.libinst file for credentials. If this fails, then the user will be presented with a User Login dialog.
When setting up security on your Update Server and Update Tracking Server, please keep in mind that Library Installer supports http and https protocols and basic, NTLM, and Kerberos authentication schemes.Digest is NOT supported. Basic is sent in clear text, but the use of https would cause it to be encrypted.
| If you want to require user login on either your update server or update tracking server, then you have to require authentication (don't allow anonymous access). |
You can choose to set a common password in Library.libinst or you can set none. If you choose to set a common password, then
You can require each user to authenticate (provide a username and password) for each update server and/or each update tracking server. If you choose this option, then:
This Title property is the same as the Content Root property. Both Title properties are mirror images of each other. Change one and the other changes too.
The Authentication Token property field is where you must type or copy in your Publisher Authentication Token. Without this property, you will not be able to generate licenses for your customers. You generate this token yourself with a command line utility included with NXT Intranet Publisher and NXT Offline Publisher products.
You can create the overall, or foundational structure for your library by simply adding folders to your library. You can add folders and move nodes around at any time while defining and building your library. However, once you deploy your library content to your users, if you modify your library structure you will need to redeploy the whole library.
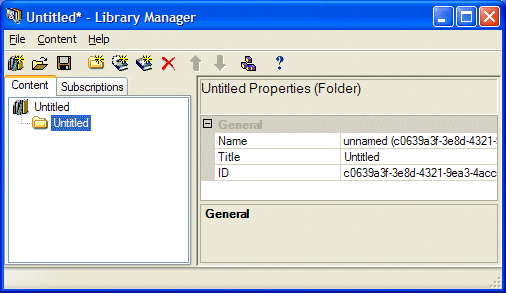
To add a folder to your library, click on a node in your library content tree (library, folder, or collection node) and choose Add..Folder from the Content or right-click menu. Figure 4 shows the properties associated with a folder node in the Library Manager.
| You can create a new folder off of any node. However, depending on the node type, the placement of the new folder is different. If you select a folder or the library node and add a new folder, that new folder will be ther first child of the node you selected. If you select a collection builder or collection reference node, Library Manager will place the new folder below the collection node as its sibling. |

Figure 4. Adding a New Folder
The only property requirements for a folder node are Name, Title, and ID. You can continue to add other folders, and even nest folders within folders, to create the necessary structure for your library. You can change the position of a folder node by choosing Move Up or Move Down from the File menu. When you move a folder node, you move its contents, naturally.
Copyright © 2006-2023, Rocket Software, Inc. All rights reserved.