Configuring DefaultACM
To configure the DefaultACM access control module, perform these
steps:
-
Open the Content Network Manager (Start > Programs > Rocket > NXT
4 > Online Server > Content Network
Manager).
-
Select the server node (the root node in the Content Network Manager tree).
-
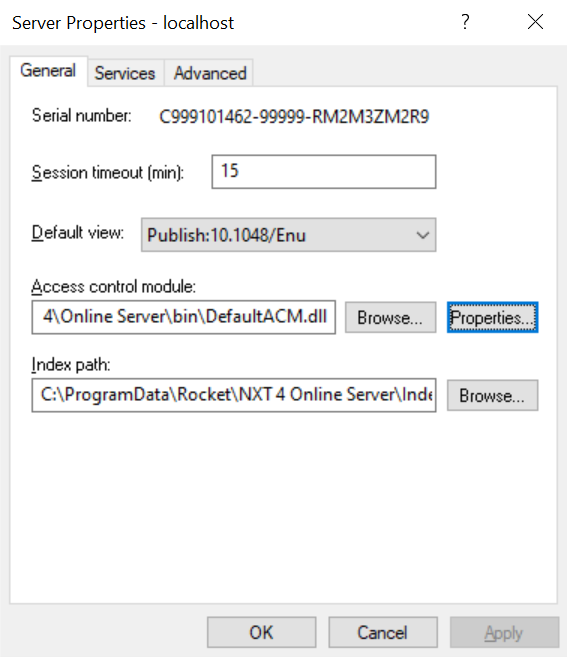
From the Action menu, choose Properties.
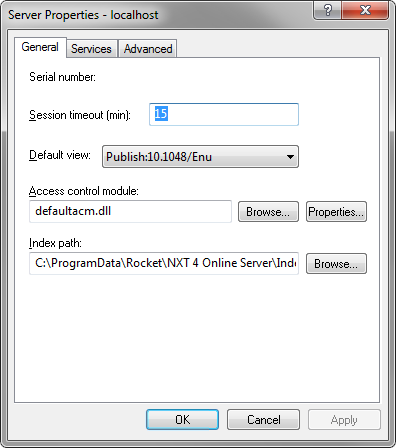
-
Click the Browse button for the Access Control module
field.
-
Select
DefaultACM and click OK to return to the Server
Properties dialog box.
 |
If you want to disable access control altogether, simply leave the Access
Control Module field blank. Be aware that if you do not enable access
control, there will be no account login for the Content Network Manager and
your site will be completely open to tampering by unauthorized persons. |
-
Click OK
to apply the changes and exit the Server Properties dialog box.
-
Select the server node again and from the Action menu, click the Properties
button.
-
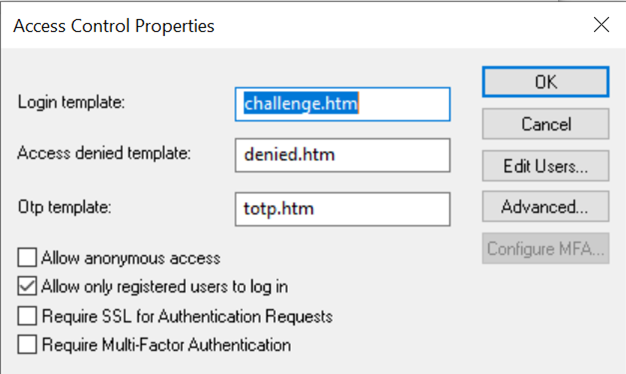
Adjust the security options to your specific requirements.
Check Allow anonymous access if you want to allow
anonymous users to access the site. By default, this box is selected with the
user name set to Anonymous and the password left blank.
 |
You might want to require a password for the Anonymous user.
Otherwise, anyone who logs in with the user name "Anonymous" can gain access
without a password. Alternately, you can disable anonymous access by clearing
the Allow anonymous access check box in the Access Control Properties
dialog box, and deleting the "Anonymous" user account. |
Check Allow only registered users to log in if you want
only registered users to access the site ("registered" means that an entry for
the user exists in the DefaultACM.ini file). By default, this box
is checked so the DefaultACM authenticates only users that specify valid
passwords.
By using the Allow anonymous access and Allow only registered users to log
in checkboxes in combination, you can configure your server to meet
your specific needs:
 Allow
anonymous access Allow
anonymous access
 Allow
only registered users to log in Allow
only registered users to log in |
Allow
anonymous access
Allow
only registered users to log in |
Allow
anonymous access
Allow
only registered users to log in |
| Selecting only Allow only registered users to log in provides
the most security and is useful for sites that are accessible on the internet
or intranet where you only want known users to be able to log on.
|
Selecting both Allow anonymous access and Allow only
registered users to log in provides moderate security and is useful for
sites that are accessible on the internet where you want to allow some basic
level of access for anonymous users but prompt them to log on when they attempt
to access content for which they do not have access rights. |
Deselecting both Allow anonymous access and Allow only
registered users to log in provides less security but is useful if you
want to enable user tracking without authentication. A registered user
(such as an administrator) can log on with a valid user name and password but
an unregistered user can supply any name and password and get anonymous access.
In this case, the supplied name is useful for association with
Manage Content functionality. |
With this combination, users are prompted to log on.
A user that logs on with a registered user name and correct password gets the
access control rights specified in the user's configuration.
If the user logs on with a registered user name and an incorrect password, the
authentication request fails.
|
With this combination, users are not prompted to log on. However,
a user who attempts to access content that is excluded from the
anonymous user view, is prompted to log on.
A user that logs on with a registered user name and correct password gets the
access control rights specified in the user's configuration.
If the user logs on with a registered user name and an incorrect password, the
authentication request fails.
|
With this combination, users are prompted to log on.
A user that logs on with a registered user name and correct password gets the
access control rights specified in the user's configuration.
A user that logs on with a with a non-registered user name, gets the same
access as the anonymous user and the access control context for the user is
given the supplied name instead of anonymous.
If the user logs on with a registered user name and an incorrect password, the
authentication request fails.
|
Check Require SSL for Authentication Requests if you want
to require SSL only for authentication.
-
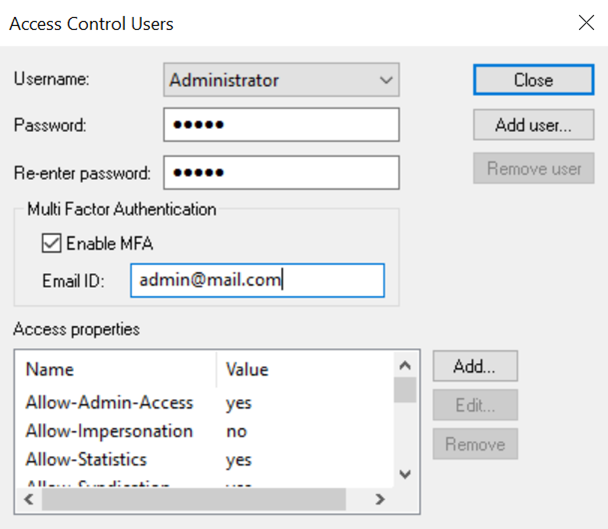
If you want to add or remove users, or change user access properties, click Edit
Users to open the Access Control Users dialog box.
-
To add a newly added view to the ViewID-List for each user who needs
access, select the name of that view in the Username field, then select ViewID-List
from Access Properties and click Edit.
-
Add the view name to the list (separated by a semicolon), and click OK.
-
In the Access Control Properties dialog box, click the Advanced button
to access the Advanced Properties dialog box.
-
In the Metering service field, enter the name of the service that
processes all metering
requests (if you enable metering).
-
Set a value for the Expire Authentication cookies after
field. This value determines how long a user session remains active (how long
can the user be logged on). The default value is 16000 seconds (4.44 hours).
-
In the Properties with Document IDs field, edit the semicolon delimited
list of access control properties
that the Access Control Module should convert from document IDs to domain
syntax, as necessary.
Use the Add button to add items to the list. Use the Remove button
to remove items from the list.
Multi-Factor Authentication in NXT
Multi-factor authentication (MFA) is an authentication method that requires users to provide two or more
forms of identification before accessing a system or application, adding an extra layer of protection
beyond just a password.
NXT supports Time-based One-Time Password (TOTP) based MFA only in the default Access Control module through Email.
This feature enhances security by requiring users to enter a 6-digit, time-limited code received via email in addition
to their password during login. The code, valid for 180 seconds, ensures the verification of user identity, reducing
the risk of unauthorized access.
Note that the MFA feature will not be activated for custom access modules.
By leveraging NXT's TOTP-based MFA through email, organizations can bolster their
security measures and ensure that only authorized individuals can gain access to critical information available on NXT server.
NXT supports MFA in two main areas:
- Online Server
- Content Network Manager
Multi-factor authentication in Online Server
NXT provides support for MFA in the Online Server module. To enable MFA in the Online Server, administrators
need to configure SMTP settings for the default access control module.
Configuring SMTP settings in Default ACM
- The MFA feature will only be enabled in Default Access Control Module. To configure the SMTP settings specifically
for the Default ACM, choose the Access Control Module option as Default ACM and then click
on the Properties button.
- In NXT, the Configure MFA button is initially disabled as a default setting. To enable this button and access
MFA configuration options, activate the Require Multi-Factor Authentication property. It is important to note that
MFA in the online server will only be enabled for users if the Require Multi-Factor Authentication
checkbox is checked.
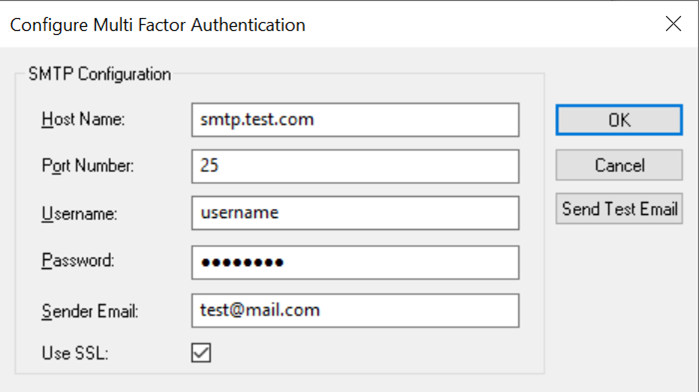
- To configure the SMTP settings, enter the SMTP host name, port number, and any required user credentials for authentication.
To ensure the proper configuration of the SMTP settings, click Send Test Email and enter any email address to receive
a test mail. This test email will verify the credentials and display the status, indicating any issues encountered while
connecting to the SMTP server.
- Determine which users should have MFA enabled by accessing the Edit Users page. By default, the Enable MFA
checkbox is cleared, and the Email address field is empty for all users. Check the Enable MFA checkbox and specify an
Email address for individual users who need to use MFA.
- Save the changes, which will automatically trigger a server restart, allowing the system to enable the MFA feature.
Once the MFA configuration is in place, when users attempt to log in to the system using their credentials, they will
encounter an OTP page to enter their OTP if MFA is enabled for their accounts. However, if MFA is not enabled for the users,
they will skip the OTP page and directly access the server without needing to input an OTP. It is important to note that
if the Allow Anonymous property is set to true, both the authentication process and the OTP page will be bypassed.
By default, OTP expiry time will be 180 seconds.
In the event of an error while generating the OTP, users will receive an error message indicating the cause of the issue.
Administrators can investigate the problem by checking the publog.txt file located in the settings path. By reviewing this file,
administrators can identify any issues related to sending email notifications and take the necessary steps to resolve the problem,
such as ensuring that the SMTP settings are properly configured.
Multi-factor authentication in Content Network Manager
MFA is supported by the Content Network Manager (CNM). When a user attempts to log in to the CNM by providing the username
and password, an OTP will be sent to their registered Email address if MFA is enabled for the account. The OTP remains valid for
180 seconds.
Upon successful authentication, the user will be prompted to enter the OTP. An OTP page will open, allowing the user to enter
the OTP received via email. In the event of any errors in connecting to the SMTP server, appropriate error messages will be displayed.
If the user enters a valid OTP, the form will be closed, and the user will be successfully logged in. However, if an invalid OTP
is entered, an error message will be displayed, and the Resend button will be enabled for the user to request a new OTP.
If the user chooses to cancel, the user will be redirected back to the credentials form to restart the authentication process.
Important: Enabling the Allow Anonymous Users option does not bypass MFA in Content Network Manager, unlike in the online server.
To configure MFA, refer the Configuring SMTP settings in Default ACM section in this topic.
Copyright © 2006-2023,
Rocket Software, Inc. All rights reserved.