Once you have created at least one subscription, you can generate licenses for that subscription to distribute to your customers. A license grants access the content of a subscription for a period of time. So, technically, your customers do not buy a subscription, they buy a license that grants access to subscription content. Your end users import a license and gain rights to the group of content you have selected in the subscription. You can create as many licenses from a subscription as you want. However, before you can generate a single license, you must generate a Publisher Authentication Token:
A Publisher Authentication Token is a code that protects your licenses. The License Management system uses it along with collection passwords, to ensure that your licenses were generated by you and not by someone else, and to prevent others from replacing your licenses with one that they create. This is a token that you generate yourself.
Typically, you only need to create one Publisher Authentication Token. You may use the same token for all libraries and licenses you distribute. Or, you may choose to use different Publisher Authentication Tokens to prevent your customers from viewing two different libraries in the same user interface.
For example, if you service two different markets - such as Law Firms and Medical Professionals - you may have two different user interfaces to serve your markets. You may want to prevent a customer who purchases libraries from both fields from viewing them together in the same interface. Using separate Publisher Authentication Tokens will facilitate this.
To generate a Publisher Authentication Token you use the the AuthTokenGen
utility that is included in the NXT Intranet and Offline Publisher
applications. This is a command line utility that you can find in your
installation bin directory. Figure 2 shows the AuthTokenGen
command line syntax.

Figure 2. AuthTokenGen Usage summary
The command line syntax for this utility contains two parts:
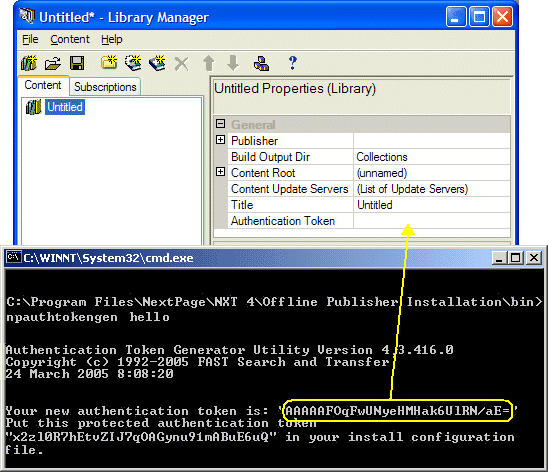
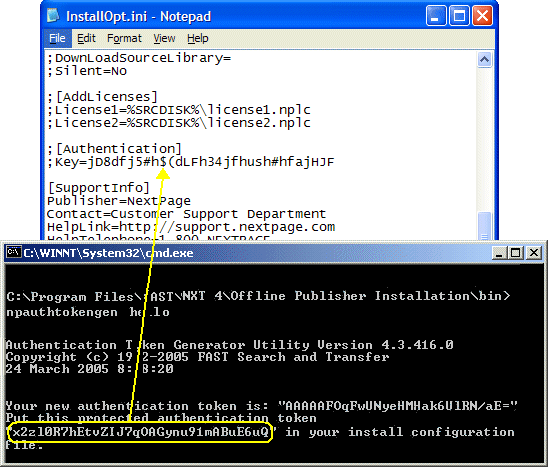
When you run this utility you receive two versions of the same token. The utility produces the actual token and an encrypted or protected version of the first. Figure 3 shows the results of running the AuthTokenGen utility with the two versions of the same token.

Figure 3. AuthTokenGen Example Results
You will need to copy and paste your two tokens in two different locations.
Therefore, you may want to record the results to a text file. To do this, type
a space after your passphrase then type >your_text_file.txt.
The results from running the utility will be recorded in the text file you
indicate. The name of this file is to your choosing. You can also provide a
complete path and file name so the file is created in a specific location. If
you do not use a path, and only use a file name, your results file will reside
in the same bin directory as the utility.
Once you have generated your Publisher Authentication Token you need to apply it in your library. You do this in the Library Manager. Copy and paste the unprotected version of your token in the Authentication Token property of your library properties and save your library (Figure 4).

Figure 4. Applying Authentication Token in Library Manager
You copy and paste the protected version of your Publisher Authentication Token into the InstallOpt.ini file when you distribute your library to a customer for the first time (Figure 5).

Figure 5. Applying Authentication Token in InstallOpt.ini
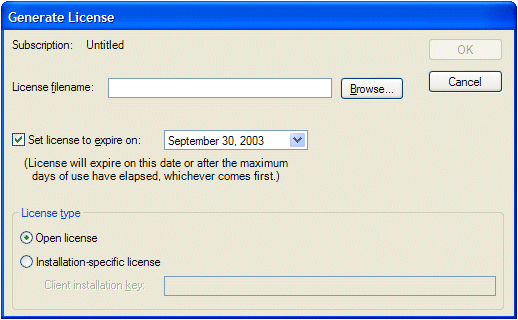
Once you have obtained and applied your two tokens, you can now start generating licenses that you can distribute to your customers. The process for generating a license is very straightforward. Select a subscription, from the subscriptions list, upon which you want to generate a license, then choose Generate License from the Subscriptions or right click menu to see the dialog in Figure 7.

Figure 6. Generate License Dialog
This dialog enables you to set properties that control the type of license and its longevity.
Each license is its own file. You can type the path and file name (with the .publc
extension) for the license file directly into this field or click the Browse
button to navigate to the appropriate location. When you
distribute your library, you must include the license files in your
distribution that pertain to the customer you are distributing to.
This setting enables you to override the License Expires property expiration date for the subscription and set an absolute expiration date on the license. The default value for this date is taken from the License expires property of the subscription, computed with the current date.
The date this property shows will be the expiration date for the license (no matter what). The license can expire sooner than this date if the maximum days of use elapses before that date. The license will not expire later than this date. If you uncheck the box, then the license will not expire on an absolute date (i.e. the expiration of the license is determined solely by the Maximum days of use property value).
There are two different types of licenses from which you can choose:
http://<your_server_name>:<port_number>
in their browser:
/NXT/Gateway.dll?f=license&license_xsl=lbr-all-licenses.htm.
Click OK to complete the creation of your new license. When you distribute your library to a customer, you must include the license file relevant to that customer in that distribution. Or, you may send a license file to a customer by email or floppy disk. Library Installer only retrieves updates and content collections, not license files.
After you have generated a license you can distribute it to a single end user or multiple users. You can use the following avenues for distibuting your licenses:
When your end users obtain this license, all they should need to do is double click on the file they receive and the system installs their license. After which, your end users have access to the subscription content indicated by the license. Library Installer and File Association Manager are two utilities that enable the "system" to install those licenses.
You can also include a license (general or client-specific) in an initial
library deployment, by including it with the redistributable install files,
content collections, and library install file on the CD/DVD you send to your
end users. If you distribute a license in this manner, you must record the
license file information (name of license file) in the InstallOpt.ini
configuration file. When your end user initially installs your library, the
install process kicks off the File Association Manager utility, which
identifies the file as a license file, initiates the LibInst.Console
importlicense command referencing the license on the CD/DVD which
imports and installs the license into the new library. This process will be
completely transparent to the end user for this type of install.
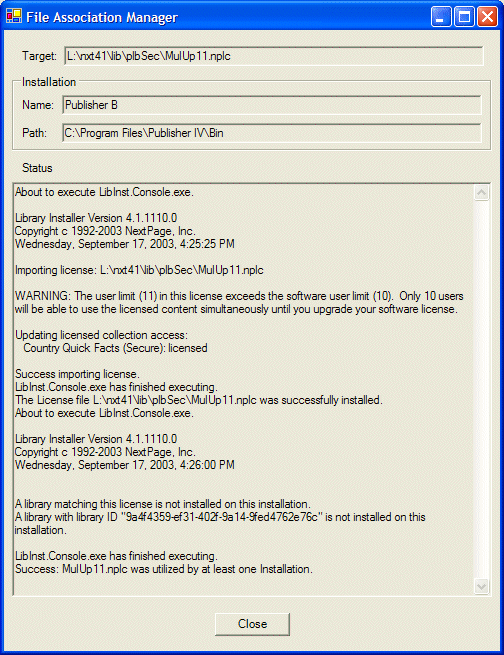
Figure 8 shows the dialog your end user will see when they double click on a license file.

Figure 7. File Association Manager Dialog - Installing a License
If your end user has multiple library installations on their machine, the File
Association Manager will direct the Library Installer (libinst.console
importlicense) to attempt to install a given license into
each library installation. However, Library Installer will only be successful
installing the license into the library it was generated for.
In the File Association Manager dialog (Figure 8) you see the Library Installer output for two installations found on an end user's machine. In the first case, the license matched a library in that installation and thus Library Installer installed the license and reported accordingly. In the second case, the license did not match any libraries found in that installation and thus the Library Installer was unable to install the license and reported accordingly as well.
When the File Association Manager finishes processing the license file for all Intranet and Offline Publisher installations, it displays a summary message at the end of the dialog and the Cancel button changes to a Close button.
You may create and distribute licenses from a web site. Doing so allows customers to visit your web site, make requests for new or updated licenses, and download the license to their local system.
The files necessary to implement a Web License Management system are included with the Rocket NXT 4 Builder product. Install the Rocket NXT 4 Builder on the web server (requires Windows and IIS). Please note that your NXT 4 Builder Serial Number must start with a "P" for the license management components to be installed.
Once NXT 4 Builder is installed, open the SubLicGen COM API.chm
file (in the Builder\Bin directory) for additional information and samples on
implementing a Web License Management system.
| Previous versions of NXT 4 Offline Publisher and Intranet Publisher (versions 4.3 and earlier) included a separate "Web License Management" install. This install is no longer included. All of the necessary files are bundled in NXT 4 Builder. |
For more information, see the WebLicenseMgmtHelp.htm file and the
SubLicGen COM API.chm file included with the Web License Management
installation.
Copyright © 2006-2023, Rocket Software, Inc. All rights reserved.