 button or choose New..Site
from the Action or right click menu to see the dialog in Figure 1, which
is the first dialog for creating a new site.
button or choose New..Site
from the Action or right click menu to see the dialog in Figure 1, which
is the first dialog for creating a new site.An NXT site is a hierarchically organized collection of content collection, content network link and folder nodes. A site is the largest independent unit for containing your content. You can host multiple sites on a single NXT server. This ability enables you to segment content by similar type, purpose, or consumers. However, grouping of content based on consumers or end users can also be accomplished with views. As you decide to create multiple sites on your NXT server you should identify content type, purpose and user divisions sufficiently large so as not to have a lot of small sites, but rather a few larger sites.
There could be many reasons for creating multiple sites on one NXT server. The following is a short list, but not exhaustive, of reasons for hosting many sites on your NXT server:
When you create a new site NXT creates a new Site Definition File (SDF) for that site on your NXT server. Each site on your server has its own specific SDF. Each time you create a new site, NXT creates a corresponding SDF. When you install NXT a default site (and consequently SDF) is created. This default site has the name of "Publish" and title of "NXT." You create sites in the Content Network Manager, but only off the server node in the server tree pane.
In the Content Network Manager, click on the server node in the server tree
pane, then click the button or choose New..Site
from the Action or right click menu to see the dialog in Figure 1, which
is the first dialog for creating a new site.
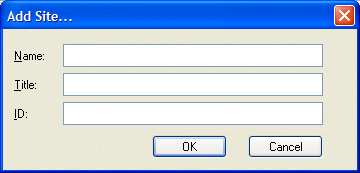
Figure 1. Creating a new site - Part 1
Name, ID, and Title are the minimum that you must provide to create a new site in the Content Network Manager. These three properties uniquely identify your site from other sites you may have on your NXT Online Server. The Name value becomes the name of the SDF and is used in URL calls to your site. The Title value shows up in the table of contents on your site. The ID value is used in access control and identifying your site from others on your server.
Once you have chosen the three site identifiers, click OK to see the dialog in Figure 2. This is the site properties dialog.
You can, if you choose to accept all the default value settings, click OK
in this dialog and successfully create a new site. Or, there are many settings
that you can customize to fit your needs, depending on the tab. Figure 2 shows
the General tab of the site properties dialog. This tab represents the
general site properties that are recorded as attributes of the site
element in the SDF.
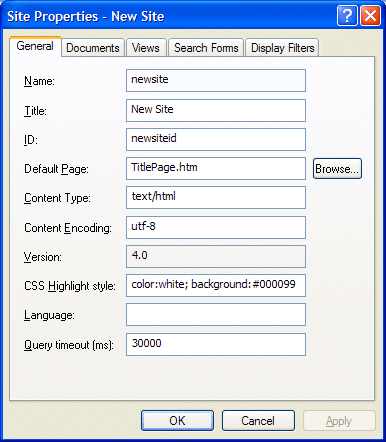
Figure 2. Site Properties General Tab
Your three site identifiers get transferred from the dialog in Figure 1 to the Figure 2 dialog. The Name value becomes unchangeable because you use this value as a part of the ViewID to access your site.
Default Page designates the page that is displayed in the document view area when you first access your NXT site. Typically this is an HTML document, however, you can change this to any document (and document type) you desire. The default for this value is TitlePage.htm. Whatever document you choose to be your default page, you must place it in your Templates directory, not in a content collection or elsewhere on your NXT Online Server.
Content Type identifies the file type of the Default Page property. When you choose the file for the Default Page property, if the file extension corresponds to a known MIME-type, NXT will populate this property value with the appropriate MIME-type. If the file's extension does not correspond to a known MIME-type, you must type it into the property field. This property value "tells" NXT how to render you default page.
Content Encoding specifies the character encoding character encoding used for the document.
NXT 4 supports ANSI templates. However, templates that have Unicode
characters must be saved as "Unicode", and all templates for a site must be of
the same encoding for all views. To convert English templates to UTF-8, make
sure there is a meta tag that specifies the encoding: <meta
http-equiv="content-type" content="text/html;charset=utf-8">.
For XML templates, use the default encoding <?xml version='1.0'?>
instead of <?xml version='1.0' encoding='iso-8859-1'?>. For
foreign language templates, you can encode the file using any supported
encoding formats. NXT 4 supports 87 encoding formats, including: ASCII,
UTF-8, UCS-2, Shift-JIS, and ANSI (ISO-8859-1). To see the complete list of
supported encoding formats, see the [encoders] section in the Publish.ini
file.
Unicode characters display as "boxes" when using the Java table of contents with Microsoft Internet Explorer. By default, the Java Virtual Machine in Microsoft Internet Explorer can display only those characters that are native to the version of Windows that is currently installed. For example, if you have installed an English version of Windows,you cannot view Japanese characters.
To display characters in the desired format, you must add information to your Windows registry by performing these steps.
HKEY_LOCAL_MACHINE\SOFTWARE\Microsoft\Java
					VM\Font Alias
<fontname>,
where <fontname> is the name of a font on your system that contains
characters for each language that you want to view in the table of contents.
Microsoft Office 2000 includes an Arial Unicode MS font that contains most
current Unicode characters.
Serif, and a value of <fontname>,
where <fontname> is the same value as for the default string.Version specifies the version number of the page specified for the document attribute. As future versions of NXT are released, the version number will be checked for compatibility. This attribute is required and is defaulted to "4.0".
CSS Highlight Style indicates how NXT will highlight words or phrases in documents from a search results list. The two values in this property dictate the text and background colors of the highlighting. Default values for this field attribute is "color:white; background:#000099," which mean white text on a blue background. You can specify any string that is valid for the STYLE attribute of an HTML SPAN code.
Language specifies the default language for the site. This value identifies the language module NXT uses to index your content, process queries, and return query results. Possible Languagevalues are: EN-US (English US); EN-UK (English UK); FR-FR (French); PT-BR (Portugese); ES-ES (Spanish); NL-NL (Dutch); DE-DE (German), JA-JA (Japanese). Default value for this field attribute is "en-us". You can override this default value when you create content collections by choosing different language settings for each collection on your site.
Query timeout (ms) specifies the maximum amount of time in milliseconds from when your server starts working on a query to when your server stops working on a query. If the server exceeds the timeout limit, a query timeout message will be displayed in your browser.
The timeout value you should use depends on how many requests you want to handle per second and how many users you want to be able to service. For example, if you want to handle .01 requests per second then your query-timeout value should be 10 milliseconds. The query timeout value also depends on how much traffic your site receives. If there is not much traffic, then you may want to set a high timeout value so queries never timeout.
For queries over Content Network links, NXT uses a timeout of the lower of two values: (1) the query timeout value or (2) 1/2 of the Content Network Link timeout value. So, the timeout value for the Content Network Link needs to be set to at least double the query timeout value. For example, if your site's Query timeout is set to 30000 ms (as in Figure 2) , then you should set this Content Network Link timeout to at least 60000 (ms).
The Documents tab in Figure 3 enables you to specify where the templates and files are located to display your site interface. If you create multiple sites on your server, you should have different locations for your interface templates and files. These paths can all be the same or different.
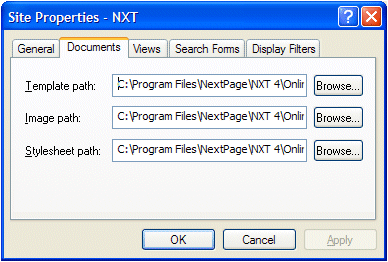
Figure 3. Site Properties - Documents Tab
The Template path property provides the path to the Templates
directory. "Template" is an overused term in the technology industry, so, in
the NXT world, templates are the following:
All templates that play a part in building your NXT site or displaying content must be in this directory. The default site uses many templates to construct the site interface and provide functionality to you.
The NXT 4 install specifies the default templates path to be C:\Program
Files\Rocket\NXT 4\Online Server\Templates. This must be a full (not
relative) path.
The Image path property provides the path to the Images directory.
The Image directory must contains all images you intend to use to
build your site user-interface or that will display in your table of contents,
searching and branding, and possibly your document viewing areas. These images
may be icons or other images within a template or on your site.
The NXT 4 install specifies the default templates path to be C:\Program
Files\Rocket\NXT 4\Online Server\Templates. This must be a full (not
relative) path.
The Stylesheet path property provides the path to the Stylesheets
directory for your site. When you or a document on your site submits a URL
request that uses the stylesheets function (f=stylesheets&fn=<stylesheet
file name>), NXT looks in the directory specified by this path.
Any cascading stylesheets or extensible stylesheets that you use or need to
render your site's user-interface must be in this directory.
Stylesheets that you reference with paths or NXT ID links in documents within content collections on your site do not need to be in this directory.
The Views tab in Figure 4 enables you to create views or windows into the content on your site. From this tab you can manage your site's views by adding new views, editing existing views, and deleting obsolete views. Views are site specific and do not cross site boundaries. Views, along with sites, provide another method for segmenting or grouping your content.
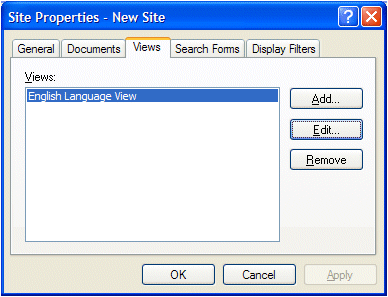
Figure 4. Site Properties - Views Tab
NXT automatically creates a default view based on the language modules you have installed when you create a new site.
The Search Forms tab in Figure 5 enables you to register other search forms that you want to use on your site. Search forms that appear in this list box are recorded in the SDF and appear in the search and branding area on your site in the Choose search form drop down list. In using search forms, you do not need to register your search forms in this tab. You may have other methods for accessing search forms from your site interface. This too is acceptable.
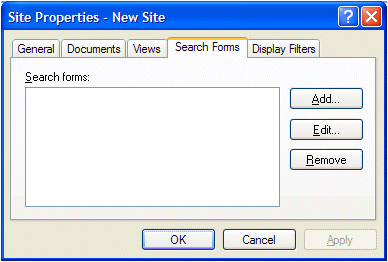
Figure 5. Site Properties - Search Forms Tab
The Display Filters tab in Figure 6 enables you to register other display filters
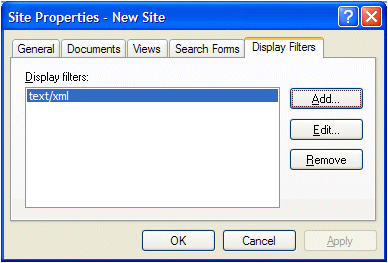
Figure 6. Site Properties - Display Filters Tab
Display filters support non-XML capable browsers by performing a server-side conversion of XML documents to HTML. Using a display filter is the only way to serve XML in a frameless HTML environment. The frameless templates place the document into an HTML page and Microsoft Internet Explorer cannot switch gears in the middle of the page.
The default XML display filter (xsldisp.dll) generates documents of
content type application/x-html-body-text instead of text/html
for the frameless environment (see Document
Source Extension for more information on content types).
xsldisp.dll does not support external resources, such as links to a
DTD, external entities, etc. In order for the XML display filter to work
correctly, you must include a matching XSL stylesheet in the content
collection. The stylesheet cannot be in the stylesheet folder, a relative path
to the web server root, or on another system or URL.
You can create your own custom display filter for use with ccBuild using the DSE API, which is installed with the NXT 4 Builder product, or contact Rocket Professional Services about creating one for you.
Once you have created another site, you will want to go to that site in your browser. There are different ways that you can provide for accessing another site; all of which involve views. When you enter an NXT site, you enter a view. All content on an NXT site resides in a view. Therefore, you can only enter a site by entering a view.
You can also create a unique URL for accessing your new site by creating the IIS application in NXT. The URL to access NXT from your browser uses a virtual directory that is set up for you during install. This is part of setting up a default site and allows you to access the default site. Creating a different virtual directory enables you to further customize your end users' NXT experience.
Copyright © 2006-2023, Rocket Software, Inc. All rights reserved.